


Are you ready to get started with a Pinterest marketing plan? The first thing you need to do is create an account, and in this week’s post, I’m going to walk you step-by-step through how to set up a Pinterest business account.
Ready to get started? Welcome to step one of your Pinterest journey! 🙌
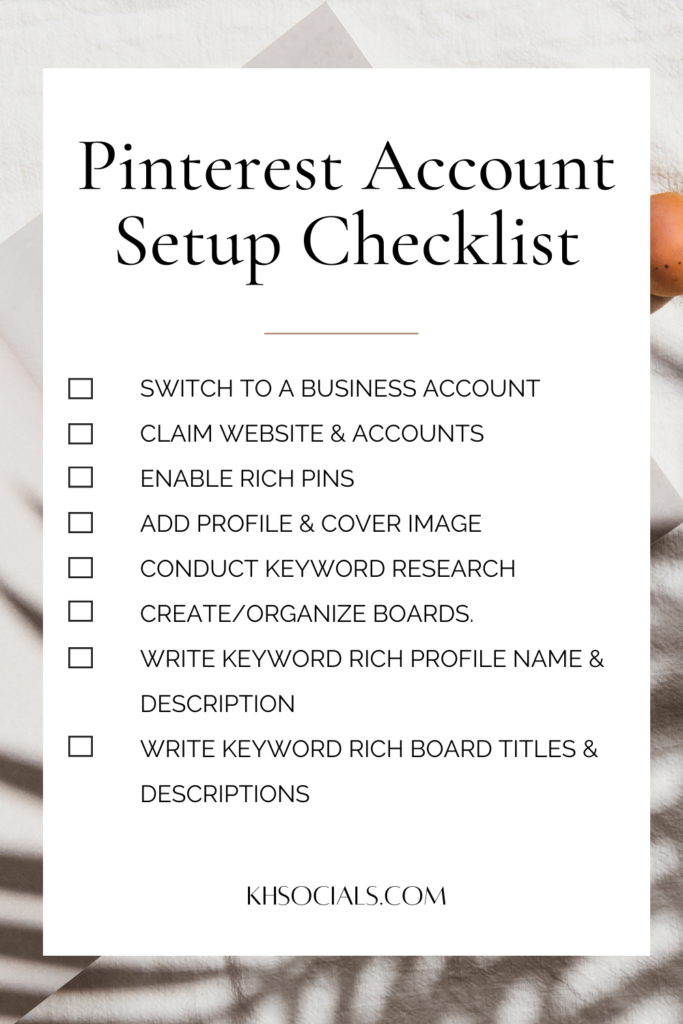
1. Switch to a business account
Before you do anything else, make sure you’re using a Pinterest business account, not a personal account. If you’re starting off with a personal account, you can switch it to a business account, and if you’re starting from scratch, sign up for a business account.
Having a business account gives you access to a ton of features you wouldn’t have otherwise, like analytics, the ability to run ads, access to Pin scheduling, and more.
2. Claim your websites and accounts
Next up, you’ll want to claim your website and associated accounts (currently, Pinterest lets you claim Etsy, Youtube, and Shopify accounts. Instagram is no longer able to be claimed). You can only claim one website unfortunately, so if you have multiple websites for your business, you’ll need to choose one.
Claiming your website allows Pinterest to track analytics on traffic from Pinterest to your website as well as content other’s are pinning to Pinterest from your site, so it’s essential to getting an accurate look at your analytics. It also adds your website to your profile description, adding another spot to drive website traffic..
3. Enable Rich Pins
UPDATE: This is now done automatically, so you don’t need to manually enable rich pins!
Having a business account allows you to set up something called Rich Pins, which pulls information from your website and includes it in your pin. This is really helpful because it provides more information about your content and helps to increase brand recognition, click through rates, and conversions. Plus, the information stays with the pin, so it will show up on all repins as well as any time someone pins something from your site.
Currently, there are three styles of Rich Pins available: article rich pins, recipe rich pins, and product rich pins. It’s a really simple process, and you can learn more about setting them up on Pinterest’s site.
Want more Pinterest marketing tips? Grab your FREE Pinterest Marketing guide here!
4. Add your profile and cover photo
Now we’re going to start adding in some of your branding elements. You’ll want to upload a profile photo, and you can also upload a cover photo, but it’s not necessary.
If you don’t upload a cover photo, Pinterest will pull your most recent Pins to create a collage. I really like this option for a lot of my clients, particularly those that have a really visually focused brand (ex. photographers, wedding planners, florists, bloggers. etc.). Otherwise, upload a photo (or video) of your choosing- just know that once you upload a cover photo, here’s no going back to the collage style background.
Personally, I like to use a logo for the profile photo and either leave the collage or use an onbrand lifestyle photo for the cover image.
5. Conduct keyword research
Because Pinterest is a (visual) search engine, solid SEO and keyword research is essential to a successful Pinterest strategy, so the next step in our set up is to conduct thorough keyword research. I share more on that here.
6. Create/organize your boards
Next up, it’s time to get your Pinterest boards ready. If you already have boards created, go through and remove or hide (switch them to Secret) any boards that aren’t relevant.
Now make a list of all of the topics you cover for your business, and begin creating boards that cover these topics. For example, if you’re a vegetarian food blogger, you may cover vegetarian breakfast recipes, vegetarian dinner recipes, smoothie recipes, etc., so these would all become boards.
I talk more about how to organize your boards here.
7. Write a keyword rich profile name and description
Now we’re going to put all of your keyword research to good use! Taking a look through your list, choose the most relevant (and general) keywords from your list and include them in your profile name and description.
You can see an example of mine below. My main keywords are around Pinterest and marketing, so they’re included in both (note: Pinterest no longer lets you use the word Pinterest in your profile name, so I had to go with Pin Marketing).

8. Write keyword rich board titles and descriptions
Finally, we’ll go back to our keyword list and create keyword rich board titles and descriptions. Here’s we’re focusing more on keywords within specific topics, rather than your general keywords. For example, I have boards covering Pinterest marketing, Instagram marketing, email marketing, entrepreneurship tips, etc., so I’ll use keywords for each that are specific to that topic.
Congratulations, you’re done! In just 8 simple steps, you can have a fully optimized and setup Pinterest business account, and you’re ready to get started growing your business with the power of Pinterest.
PIN IT FOR LATER

")


[…] thing you’ll need to do is set up your Pinterest business account. You can learn all about that here (or check out my account set up package […]
[…] How to Set Up A Pinterest Business Account {Checklist … […]
[…] How to Set Up A Pinterest Business Account {Checklist … […]